Thursday, 11 July 2024

How to use ChatGPT to create Input and Display Page


Creating input and display data using PHP-MySQL involves several steps. 

Step 1 - Create a MySQL database with tables that store the data you need. 

Step 2 - Then, using PHP, you develop forms where users input data, such as user information or product details. PHP scripts handle form submissions by connecting to the MySQL database, executing SQL queries to insert or update data. 

Step 3 - For displaying data, PHP retrieves information from the database through SQL queries and formats it into HTML for presentation on web pages. This approach ensures data integrity and security by sanitizing inputs and using prepared statements to prevent SQL injection attacks. 

Step 4 - Styling frameworks like Bootstrap enhance the user interface, while JavaScript libraries such as DataTables provide interactive features like sorting and pagination for displaying data in a more organized manner.

I have made video that simulates the above steps using ChatGPT. Enjoy:


Create FAVICON for your website

 A favicon, short for "favorite icon," is a small, distinctive icon associated with a particular website or web page, typically displayed in the browser's address bar, tabs, bookmarks, and shortcuts. It is usually a 16x16 or 32x32 pixel image in formats like ICO, PNG, or SVG. Favicons enhance the user experience by providing a visual cue for identifying and differentiating websites, especially when multiple tabs are open. They are an important aspect of web branding, helping reinforce a website's identity and making it easily recognizable to users.

Favicon use by popular brand

Favicons are important for several reasons:

  1. Branding and Recognition: Favicons serve as a visual representation of a website, helping to reinforce the brand and make the site easily recognizable in a user's browser tab, bookmarks, and history.
  2. User Experience: A favicon enhances the user experience by making it easier to identify and switch between multiple open tabs. This is particularly useful for users who often have many tabs open simultaneously.
  3. Professionalism: Having a well-designed favicon contributes to the overall professionalism and credibility of a website. Sites without a favicon can appear incomplete or less trustworthy to visitors.
  4. Bookmarking and Shortcuts: When users bookmark a page or create a shortcut to it on their devices, the favicon provides a quick visual reference, making it easier for them to locate and return to the site.
  5. SEO Benefits: While the direct impact on search engine rankings is minimal, a favicon can contribute to better user engagement and site usability, which are factors that can indirectly influence SEO performance.

In summary, favicons play a crucial role in branding, user experience, and the overall perception of a website.

Step to create favicon for your website:

Step 1 - Create a PNG image using your favourite Image Editor

You can use Canva to create your favicon image. It is free. Create new design using 'Logo' or Custom size 500x500px. I use Canva to create the following Image:


Download your image as PNG.

Step 2 - Open Favicon Creator website Favicon.io

Upload your image and Download. Extract the files. Favicon.io will gives several images. For website, you can use favicon.ico. Upload the files to the images folder and insert the codes in your HTML.

<link rel="icon" type="image/x-icon" href="/images/favicon.ico">

All done!! Good luck.


How to set Custom Domain on Blogger using Cloudflare


Cloudflare is a global network service provider that enhances the security, performance, and reliability of internet properties. It acts as a content delivery network (CDN) and distributed DNS (Domain Name System) service, offering protection against DDoS (Distributed Denial of Service) attacks, malicious traffic, and other cyber threats. Cloudflare's infrastructure optimizes the delivery of web content, reducing latency and increasing site speed for users worldwide. Additionally, it provides various tools and analytics to help website administrators manage and monitor their traffic effectively. Cloudflare's services are widely used by websites and applications to ensure a secure, fast, and uninterrupted online presence.

A domain name is a human-readable address used to access websites on the internet, serving as an easy-to-remember alternative to numerical IP addresses. It is part of the Domain Name System (DNS), which translates these domain names into IP addresses that computers use to locate and communicate with each other. A domain name consists of two main parts: the second-level domain (SLD), which is the unique identifier chosen by the user, and the top-level domain (TLD), such as .com, .org, or .net. For example, in "example.com," "example" is the SLD, and ".com" is the TLD. Domain names are essential for branding, marketing, and accessibility on the web.

You can park your domain name on Cloudflare for free and utilize many of Cloudflare infrastructure. Now you own a domain name, for example this blog www.amzari.net. I have configured my domain name to point to Cloudflare name server. 

Step 1 - Point domain name to Cloudflare name server

 Read it here to configure domain name to cloudflare name server.

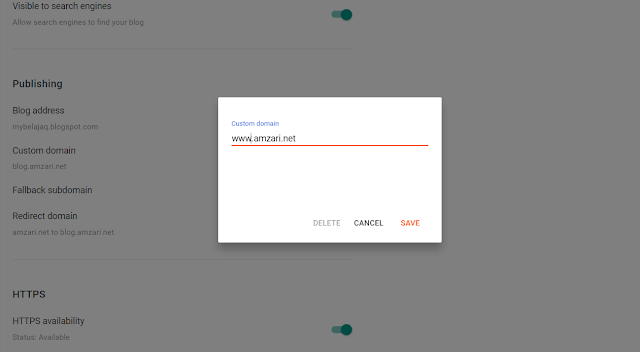
Step 2 - Set Custom Domain on Blogger

Go to Setting on the right, scroll down a bit, under Publishing. Set Custom Domain Name. Blogger will gives instruction to set TWO CNAME on DNS Record. This should be done on Cloudlfare.


Step 3 - Set DNS Record for the domain on Cloudflare

According to Blogger Support page, for naked domain, you can set FOUR DNS A records to point to Blogger IP Address:

  • 216.239.32.21
  • 216.239.34.21
  • 216.239.36.21
  • 216.239.38.21

Set CNAME to point to ghs.google.com according to your domain. i.e www for root, blog for subdomain and etc as illustrated below:


Test your new custom domain. Good Luck.


Wednesday, 10 July 2024

How to set Custom domain name using CPanel


Maybe you owned a domain and already subscribed a hosting services, which mostly uses CPanel. However, one of the sub-domain, you would like to point to a blogger, for some reason, all the blogs offered in Softaculous seems not right and you already have a blog[ger], which is in my case.

In my case, I have point my domain amzari.net to a CPanel and would like to point www.amzari.net to this blog (mybelajaq.blogspot.com). Upon research and testing, here is the step:

Step 1

Set a custom domain on your blogger admin. Blogger will give instructions to set TWO Cname in your domain zone management.


Step 2

Login to your CPanel account. Go to Domains > Manage Domain > Modify the Zones. 

Add both CNAME as instructed by Blogger.


Wait for a few hours before the domain properly propagate.

Good Luck.


How to use ChatGPT to create Input and Display Page

  Creating input and display data using PHP-MySQL involves several steps.  Step 1 - Create a MySQL database with tables that store the data ...